lørdag den 3. november 2018

Modern Team Sites Permissions - Deep Dive

Introduction

Modern team sites are perfect for fast collaboration, but many enterprise companies requires a managed approach. I often experience questions like:
  • How do we get an overview of all users and their permissions in a single view?
  • Can we use Active Directory groups?
  • Can we prevent users from sharing content with others?
  • Can we prevent breaking inheritance of permissions?
  • What about old SharePoint groups can we use them?
During this article I will try to answer the questions above and give an overview of permissions for a modern team site.

Creating a modern team site

Lets start by creating a modern team site.
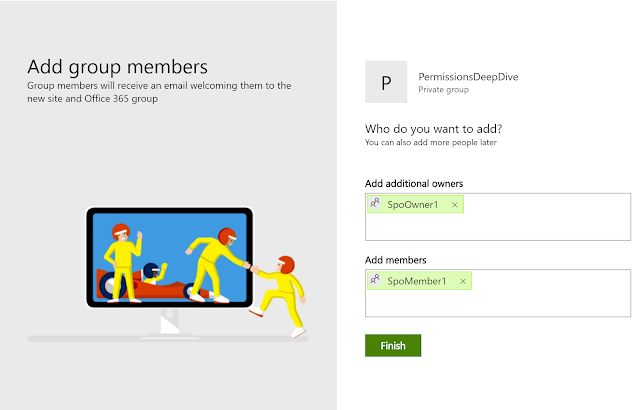
Log into your tenant and create a new team site:


Notice the last image. You can add members and owners only.

Site Permissions

In the previous section we added SpoOwner1 as owner, and SpoMember1 as member to the site. Lets see what happened, but before that lets have a look back to the old classic SharePoint days.

Classic SharePoint Site

Below we see a classic site settings page:

We have a Permissions section where have a very fine grained control of SharePoint groups. Lets have a look at Site permissions:


Here we can see the different groups on the site, and notice each group has a permission level we can configure dependent on our requirements. Try to click on Permission levels in the top:
Here we see the default permission levels, one for each group. Lets have a look on a permission level:
Above is only a subset of all the permissions you can set. Lets make a last test too. Go back to a SharePoint group and lets add an Azure Active Directory:
As you can see, I can add an Azure Active Directory group to a SharePoint group. Very often sites are managed by adding one or more departments etc to SharePoint sites to obtain some kind of governance level.

If we summarize on the classic section above, we have a very fine grained control over permissions. If we have a requirement that we want to add an department to x numbers of sites we can do it by adding Active Directory Groups to the SharePoint groups. 

Modern Team Site

Lets try to do the same exercise again, but for a modern team site. Below the site settings for a modern team site is shown:
As you can see above the permissions section is gone. Lets cheat a little and go to the classic permission settings page /_layouts/15/user.aspx (add this to the url):
Here we can see there is three SharePoint groups. In the Members group there is a group (we will get back to that) called PermissionsDeepDive Members, and the two other groups are empty. When we created the site we could add Owners and Members, so where is the Owners? To answer that question I have to cheat a little again. This time I navigate to following url for the site /_layouts/15/mngsiteadmin.aspx to see Site Collection Administrators:
Once again we have a group that is added to SharePoint, and that group is site collection administrator on the site.

But where do these two groups come from?

Office 365 Groups

I wont go deep into what a Office 365 group is. There is plenty of articles on that. One of my personal favorites can be read here: office-365-groups-explained. In short an Office 365 is a central place to store member ship for multiple products. It was not very clear, but when I created a Modern Team Site I actually created an Office 365 group with following Components:
  • Office 365 security group
  • SharePoint Online Site
  • Shared Outlook Calendar
  • Shared Mailbox
So we got much more than just a SharePoint site. If I go into my mailbox, and look under Groups section I can see my group:

In the top you can see I have a mailbox, Files (SharePoint), Notebook (OneNote), Planner ..

This is why we can't have all the fine grained SharePoint permissions anymore. We need a more simple model that can be managed across multiple services in a central place. 

Site Permissions

OK, that is all good. Microsoft has hidden all of the technical stuff for a reason, so where do we see site permissions on a modern team site? Lets get back to the modern team site front page and click on the members button in the top left corner:


Clicking that gives the following view:

It is important to highlight here, that what you see is taken from the Office 365 Group and not the local SharePoint Group. If you cheat a little and add other users to the local groups, they are not viewed here. Another very important thing here is you cannot add groups to an Office 365 Group. Do you have a scenario where you need to add an organizational unit to a large amount of sites, and manage them through Active Directory group you need develop a customized solution or find a partner product.

You can only have owners and members. Only owners can grant permissions on the site level, however members can grant permissions on list level (we will get back to that next).

So what is my personal thought on this? As the article is written I am working for Microsoft, but this article is my personal point of view and observations. I have kind of mixed feelings here. There is so many new cool features in the modern look and feel, and having shared calendar and mailbox is really cool. On the other hand in many enterprise scenarios the lack of Active Directory Groups is a big problem, that in many scenario's requires a custom solution. 

Folder and File Permissions

If you think I am finished and there is no more important permissions settings left to discuss, your very wrong. But this super exiting subject should keep you going - your already this far so why not 😂 

Lets look at permissions on files and folders level. On the image below you can see the permission settings for a folder:


Notice we have a new permission level to the left (Visitors). What we see here is not the Office 365 group anymore but the local SharePoint groups. In the top you can grant access to specific users, and if you add a new user with read permissions, its not added to the local visitor SharePoint group but in the root with read permission level. So I am not sure why the Visitor group is even there.

Another very important observation is that you can actually add Active Directory Groups on files and folders.

If you add a user that is not added to the site to a specific file or folder (break permissions), then the user needs to link directly into that file or folder. Accessing the site will give a permission error.

Getting a permission view

Very often enterprises has a requirement to get an overview of who has access to what. As you seen earlier in this blog, on site level that is easy. But if you need it on broken permissions, on files and folders it is another story. For most levels in Advanced Permissions there is a check permission for a specific user. However it wont give you a usable view. There is different partner solutions on the market, else you have to create a custom solution. The PnP framework has features that can provide you that kind of information, see Meassure-PnPList. If you have very large lists, notice getting this kind of information can run for days. So plan for some kind of compute strategy with Azure functions etc.

Conclusion

My take ways from the post is:
  • Site permissions are controlled using Office 365 Groups where content are controlled via classic SharePoint groups
  • You cannot add AD groups to Office 365 Groups and by that site permissions (you can use dynamic groups to some extend)
  • You can add AD groups to content in lists and libraries
  • If you only add users to a give folder or file, they need the direct link to that file or folder. They cannot access the site url
  • There is no complete permissions overview
Is Modern Team sites then the way to go? I would say so. There is no doubts, that this is the template Microsoft is betting on. Going forward this will get better and better. Just the look and feel is enough seen from my point of view. That said I hope we will see better management tools going forward.



torsdag den 20. september 2018

Angular 6, ADAL and ASP.NET Web API (B2B)

Background

This article is based on challenges when starting with Angular 6, ADAL and Web API Core 2.1. So its an article from a beginner to beginners, so there will properly be many thinks that should have been done differently. It's a sample of making the most minimal working setup.

As stated I am new to Angular, so my first question was how do I work work with Angular. There is only a version 5 as a template in Visual Studio, and I realized fast, that if you want to use Visual Studio as a tool, you have to do some configuration to make Visual Studio and Angular work together. After some conversations with more experienced Angular developers, I decided to split the Web API and the Portal in two separate projects. I work with Web API in Visual Studio, and Angular via the Angular cli (command line interface). In this way I feel I am using the right tool for the right technology and not trying to bend Angular into the Visual Studio world. When working with Angular I use Visual Studio Code as editor and debugger, but its nothing more than an editor. You can use Notepad or what ever you feel like.

Prerequisites

Before starting make sure you have installed:
  • NPM
  • Angular CLI
  • Visual Studio for the Web API
Following frameworks will be used:

Implementation

Lets get started.

Azure Active Directory Setup

Sign into your Active Directory and create a new app registration.


Notice when you have created your Web API and Angular projects you need to add the reply url's (you properly first know you API url after creating the project. Go back following and add it to Reply url's):
Save following:
TenantId (click Azure Active Directory->Properties)
ClientId

Angular

Navigate to an empty folder where you want your projects to be located, and type following:

ng new AngularPortal --routing
cd AngularPortal

This will create a new Angular Project through the Angular CLI.

Add the ADAL/Angular wrapper:
npm install --save adal-angular4

I am going to use Visual Studio Code so I go (but feel free to use your favorite editor):
AngularPortal Code .

You can try run your application by running:
ng serve --open

Create components needed in the CLI:

ng g class authinterceptor
ng g c secured
ng g c nonsecured
ng g c authcallback
ng g service api

Add following to your files:

authinterceptor.ts

import { Injectable } from '@angular/core';
import { HttpEvent,HttpHandler,HttpRequest,HttpInterceptor } from '@angular/common/http';
import { AdalService } from 'adal-angular4';
import { Observable } from 'rxjs';

@Injectable()
export class AuthInterceptor implements HttpInterceptor {
constructor(private adalService: AdalService) { }

intercept(req: HttpRequest<any>, next:HttpHandler): Observable<HttpEvent<any>>{
const authHeader = this.adalService.userInfo.token;

const authReq = req.clone({headers: req.headers.set('Authorization', `Bearer ${authHeader}`)});
return next.handle(authReq);
}
}

secured.component.ts
import { Component, OnInit } from '@angular/core';
import { ApiService } from '../api.service';

@Component({
selector: 'app-secured',
templateUrl: './secured.component.html',
styleUrls: ['./secured.component.css']
})
export class SecuredComponent implements OnInit {
private contacts: Array<object> = [];
constructor(private apiService: ApiService) { }

ngOnInit() {
}

callApi(){
this.apiService.getValues().subscribe((data: Array<object>) => {
this.contacts = data;
console.log(data);
});
}
}

nonsecured.component.ts
import { Component, OnInit } from '@angular/core';

@Component({
selector: 'app-nonsecured',
templateUrl: './nonsecured.component.html',
styleUrls: ['./nonsecured.component.css']
})
export class NonsecuredComponent implements OnInit {
constructor() { }
ngOnInit() {
}
}
 
authcallback.component.ts
import { Component, OnInit, NgZone } from '@angular/core';
import { Router } from '@angular/router';
import { AdalService } from 'adal-angular4';
@Component({
selector: 'app-auth-callback',
templateUrl: './authcallback.component.html',
styleUrls: ['./authcallback.component.css']
})
export class AuthCallbackComponent implements OnInit {
constructor(private router: Router, private adalService: AdalService, private _zone: NgZone) { }
ngOnInit() {

var config = {
tenant: 'xxxxxxxx-a8b0-4555-97b3-70001a6a7448',
clientId: 'xxxxxxxx-afc3-4327-b668-9e9c894bc276',
redirectUri: "http://localhost:4200/authcallback/",
logOutUri: "http://localhost:4200",
postLogoutRedirectUri: "http://localhost:4200",
endpoints: {
"https://localhost:44300/": "xxxxxxxx-9947-466c-be42-98c8a44db994"
}};

this.adalService.init(config);

this.adalService.handleWindowCallback();
setTimeout(() => {
this._zone.run(
() => this.router.navigate(['/'])
);
}, 200);
}
}

api.service.ts
import { Injectable } from '@angular/core';
import { HttpClient} from '@angular/common/http';

@Injectable({
providedIn: 'root'
})
export class ApiService {

constructor(private httpClient: HttpClient) {}

getValues(){
return this.httpClient.get("https://localhost:44300/api/values");
}
}

app.module.ts
import { BrowserModule } from '@angular/platform-browser';
import { NgModule } from '@angular/core';

import { HttpClientModule, HTTP_INTERCEPTORS } from '@angular/common/http';

import { AppRoutingModule } from './app-routing.module';
import { AppComponent } from './app.component';

import { AdalService,AdalGuard } from 'adal-angular4';
import { SecuredComponent } from './secured/secured.component';
import { NonsecuredComponent } from './nonsecured/nonsecured.component';
import { AuthInterceptor } from './auth-interceptor';
import { Nonsecured2Component } from './nonsecured2/nonsecured2.component';
import { AuthCallbackComponent } from './authcallback/authcallback.component';

@NgModule({
declarations: [
AppComponent,
SecuredComponent,
NonsecuredComponent,
Nonsecured2Component,
AuthCallbackComponent
],
imports: [
BrowserModule,
AppRoutingModule,
HttpClientModule
],
providers: [AdalService, AdalGuard,{ provide: HTTP_INTERCEPTORS, useClass: AuthInterceptor, multi: true }],
bootstrap: [AppComponent]
})
export class AppModule { }

app.component.ts
import { Component,OnInit } from '@angular/core';
import { AdalService } from 'adal-angular4';
import { environment } from '../environments/environment';

@Component({
selector: 'app-root',
templateUrl: './app.component.html',
styleUrls: ['./app.component.css']
})

export class AppComponent {
config = {
tenant: 'xxxxxxxx-a8b0-4555-97b3-70001a6a7448',
clientId: 'xxxxxxxx-afc3-4327-b668-9e9c894bc276',
redirectUri: "http://localhost:4200/authcallback/",
logOutUri: "http://localhost:4200",
postLogoutRedirectUri: "http://localhost:4200",
endpoints: {
"https://localhost:44300/": "xxxxxxxx-9947-466c-be42-98c8a44db994"
}};

constructor(private adalService: AdalService)
{
}
ngOnInit() {
}

login()
{
this.adalService.init(this.config);
this.adalService.login();
}

logout()
{
this.adalService.init(this.config);
this.adalService.logOut();
}

}

app-routing.module.ts
import { NgModule } from '@angular/core';
import { Routes, RouterModule } from '@angular/router';
import { AdalGuard } from 'adal-angular4';
import { SecuredComponent } from './secured/secured.component';
import { NonsecuredComponent } from './nonsecured/nonsecured.component';
import { Nonsecured2Component } from './nonsecured2/nonsecured2.component';
import { AuthCallbackComponent } from './authcallback/authcallback.component';

const routes: Routes = [
{ path: '', component: NonsecuredComponent },
{ path: 'authcallback', component: AuthCallbackComponent },
{ path: 'nonsecured2', component: Nonsecured2Component },
{ path: 'secured', component: SecuredComponent, canActivate: [AdalGuard] },
];

@NgModule({
imports: [RouterModule.forRoot(routes)],
exports: [RouterModule]
})
export class AppRoutingModule { }

secured.component.html
<p>
secured works!
</p>

<div (click)="callApi()">Call secured API</div>

app.component.html

<!--The content below is only a placeholder and can be replaced.-->

<table>
<tr>
<td routerLink="/">Non Secured</td>
<td div routerLink="/secured">Secured</td>
<td (click)="login()">Login</td>
<td (click)="logout()">Logout</td>
</tr>
<tr>
<td colspan="4">
<router-outlet></router-outlet>
</td>
</tr>
</table>

ASP.NET Core Web API

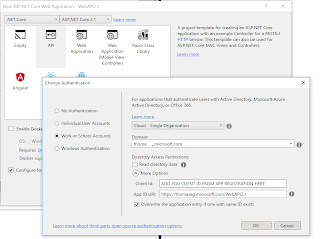
Create a new ASP.NET Core Web API. I found its most easy to add the authentication while creating the project so the owin middle where is created for you:

Because we in debug are having two different hosts/domains we will need to configure CORS. For this sample I disable CORS. Dont do that in productions. Also we need to tell the API to use bearer authentication. The relevant files are shown below:

Startup.cs
using System;
using System.Collections.Generic;
using System.Linq;
using System.Threading.Tasks;
using Microsoft.AspNetCore.Builder;
using Microsoft.AspNetCore.Hosting;
using Microsoft.AspNetCore.HttpsPolicy;
using Microsoft.AspNetCore.Mvc;
using Microsoft.AspNetCore.Authentication;
using Microsoft.AspNetCore.Authentication.AzureAD.UI;
using Microsoft.Extensions.Configuration;
using Microsoft.Extensions.DependencyInjection;
using Microsoft.Extensions.Logging;
using Microsoft.Extensions.Options;
using Microsoft.AspNetCore.Authentication.JwtBearer;

namespace WebApi21
{
    public class Startup
    {
        public Startup(IConfiguration configuration)
        {
            Configuration = configuration;
        }

        public IConfiguration Configuration { get; }

        // This method gets called by the runtime. Use this method to add services to the container.
        public void ConfigureServices(IServiceCollection services)
        {
            services.AddAuthentication(AzureADDefaults.BearerAuthenticationScheme)
                .AddAzureADBearer(options => Configuration.Bind("AzureAd", options));
            services.AddMvc().SetCompatibilityVersion(CompatibilityVersion.Version_2_1);

            var authority = Configuration["AzureAd:Instance"] + Configuration["AzureAd:TenantId"];

            services.AddAuthentication(JwtBearerDefaults.AuthenticationScheme)
            .AddJwtBearer(options =>
            {
                options.Authority = authority;
                options.Audience = Configuration["AzureAd:ClientId"]; // web api client id
            });

            services.AddCors(options =>
            {
                options.AddPolicy("AllowSpecificOrigin",
                    builder => builder.AllowAnyOrigin()
                           .AllowAnyHeader()
                           .AllowAnyMethod());
            });
        }

        // This method gets called by the runtime. Use this method to configure the HTTP request pipeline.
        public void Configure(IApplicationBuilder app, IHostingEnvironment env)
        {
            if (env.IsDevelopment())
            {
                app.UseDeveloperExceptionPage();
            }
            else
            {
                app.UseHsts();
            }

            app.UseDefaultFiles();
            app.UseStaticFiles();
            app.UseCors("AllowSpecificOrigin");
            app.UseHttpsRedirection();
            app.UseAuthentication();
            app.UseMvc();
        }
    }
}

Values Controller:
using System;
using System.Collections.Generic;
using System.Linq;
using System.Threading.Tasks;
using Microsoft.AspNetCore.Authorization;
using Microsoft.AspNetCore.Mvc;

namespace WebApi21.Controllers
{
    [Authorize]
    [Route("api/[controller]")]
    [ApiController]
    public class ValuesController : ControllerBase
    {
        // GET api/values
        [HttpGet]
        public ActionResult<IEnumerable<string>> Get()
        {
            return new string[] { "value1", "value2" };
        }

        // GET api/values/5
        [HttpGet("{id}")]
        public ActionResult<string> Get(int id)
        {
            return "value";
        }

        // POST api/values
        [HttpPost]
        public void Post([FromBody] string value)
        {
            // For more information on protecting this API from Cross Site Request Forgery (CSRF) attacks, see https://go.microsoft.com/fwlink/?LinkID=717803
        }

        // PUT api/values/5
        [HttpPut("{id}")]
        public void Put(int id, [FromBody] string value)
        {
            // For more information on protecting this API from Cross Site Request Forgery (CSRF) attacks, see https://go.microsoft.com/fwlink/?LinkID=717803
        }

        // DELETE api/values/5
        [HttpDelete("{id}")]
        public void Delete(int id)
        {
            // For more information on protecting this API from Cross Site Request Forgery (CSRF) attacks, see https://go.microsoft.com/fwlink/?LinkID=717803
        }
    }
}

Test

Lets test it. Start your API project by in Visual Studio (F5), and your Angular portal (ng serve):

If you click secured you should not be able so see secured component. Click login, and now you can click Secured. In the secured component click Call secured API and in the console you should see an array from the API.

Feel free to comment article if you have any changes or additions to the description.